Wednesday, May 1, 2013

Camera Giveaway

Snapknot is giving away a Canon 5D Mk III or a Nikon D800!


Big thanks to the SnapKnot wedding photography directory for offering this great camera giveaway!

Thursday, January 24, 2013

My Day Thus Far


•Woke up at ~9:30am. Alexis still asleep (1st time this week!)

•Spent 15 minutes debating the merits of getting up or going back to sleep until Alexis woke up. Dragged self out of bed.

•Suited up and went out to let the geese/ducks out and give them water.

•Discovered the bull apparently levitated out of his pen and is back out in the field again.

•Came back in, had a cup of tea.

•Alexis woke up about 10:30

•Changed dirty diaper, got her dressed.

•Nursed Alexis.

•Heated up oatmeal, fed Alexis.

•Made eggs, ate over the kitchen counter. Stopped Alexis from getting into things 3 times while eating.

•Diaper blowout, changed Alexis again.

•Washed hands. Pulled Alexis' hands out of the toilet. Washed her hands.

•Loaded laundry. Alexis helped by putting one piece of clothing in at a time, then started taking them back out and got upset when I stopped her and closed the door. Let Alexis start the machine, then got upset when I didn't let her keep pushing the buttons.

•Emptied the dishwasher. Alexis helped by handing me the plates one at a time, then got bored, opened the laundry half of the closet door, and tried to play with the washing machine buttons again. Got upset when I stopped her.

•Took the garbage can from the nursery to the bathroom to bleach it in the tub. Just stopped Alexis' from putting her hands in the toilet.

•Sat Alexis down in the hallway, put cleaner in the toilet, caught Alexis before she could made it back to the toilet.

•Realised taking the garbage out of the nursery didn't remove the funky smell. Found dead mouse in a trap in the water heater closet.

•Put Alexis in her crib with a toy, threw out mouse.

•Alexis turning into a pumpkin, sat down around 1pm to watch baby youtube videos until nap time.

Wednesday, September 26, 2012

A Shutterfly freebie


Because I've got an account on zulily, I got a code for a "free" photo book from Shutterfly ("free" because shipping is not included, as per usual). It expired today, so I threw together a quick photo book and got my order sent off. I rather like the pre-templated theme I found there - a cute little woodland storybook, and all I had to do was include pictures of Alexis, and her name. Unfortunately it's some sort of "premium" theme, and thus costs more. So with shipping and the preimum theme, my "free" book is costing me about $12. I'm interested to see what the book quality is like when it gets here. So far, I can say that using Shutterfly makes me appreciate Mixbook's interface a lot more! It's similar, but Mixbook has more editing options and is a little more intuitive.


Click here to view this photo book larger
Shutterfly offers exclusive layouts and designs so you can make your book just the way you want.

Wednesday, August 15, 2012

Crossover Pinafore and Ruffle Bum Bloomers

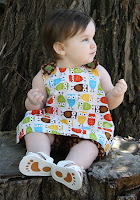
Found a tutorial for an adorable little crossover pinafore at Smashed Peas and Carrots. I had a bit of trouble sewing around the straps (I'm just not very good at sewing tight curves) but otherwise it was a very easy dress to make, and the instructions were excellent. Alexis is only 8 months old here, but she's a big girl and it's closer to a long tunic top for her, rather than a dress. Because of the crossover, the design seems to be very forgiving for sizing, and I'm looking forward to Alexis being able to continue to wear it as a top as she gets bigger.

I decided to make it reversible, and to make the front and back different on both sides (I like the contrast between the front pattern and the straps). I wasn't even thinking when I picked out buttons that they'd need to be the same size to use the same button holes! Luckily I just happened to choose 2 styles of button that are almost identical in size.
I also made a little pair of ruffled bloomers to go with the dress, following the directions at The Sewing Dork. I had the darn things almost done when I realized I'd put them together wrong and had to pull out all the seams and start over (I'd even zigzagged most of my seams already). And in spite of using a pair of pants that fit Alexis quite well, when I tried them on her they were gaping horribly in the back of the waist. I'm thinking it's because I used quilting cotton to make the bloomers, and the pants I used as a pattern were stretchy (I've now bought some cheap cotton to use to make a test garment the next time I want to make my own pattern from something). I was able to salvage them by patching in a little piece of the tan broadcloth I used to make the ruffles.

The last photo is the only one I snagged of the front while standing. I stood her up so Grandma and Grandpa could hold her arms, and she got upset that I didn't pick her up! She's a bit of a momma's girl....  

Friday, August 3, 2012

Giving a "Helping Hand"

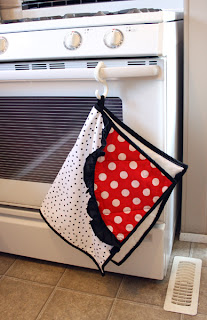
My sister-in-law just bought her first house. This seemed like a perfect excuse to sew a housewarming gift - especially since I was too occupied baby wrangling to be able to help out with the grand reno scramble on possession weekend. I decided to make a "Helping Hand" (which is an all-in-one apron/dishtowel/double-handed hot pad apparatus) from Tatertots and Jello. I figured it would be a useful accessory in a small kitchen... but I also enjoy the wordplay - see, I still gave her a helping hand! ;)

Sadly while the instructions are still available on Tatertots and Jello, the pattern pieces for the pockets were hosted on a site that no longer exists. Of course, I realized this after I'd already bought fabric and Insul-brite. Rather than scrap the idea, I went ahead and made my own pocket patterns. I'll post them here as well, in case someone else finds them useful. I don't have a way to supply them as .pdf files right now, just as .jpgs. But I included a size guide, so with a little work others should be able to get them to print out at the correct size. 


I decided to do ruffles on the pockets instead of bias tape, and rather than cutting the outside fabric larger and using it to make an edge, I just did the entire thing in bias tape. Mostly because I wanted to do the outside out of terry cloth so it would function a little better as a towel.

I also added 2 extra loops to the back out of bias tape, and made some detachable straps - it didn't really seem to be very functional as an apron without some way to tie it on (I'm not much for the "tuck them into your pants" aprons).  The straps just have a little square of applix (velcro) on them so they can loop around the tabs.
 

All in all I'm pretty happy how it turned out, particularly since this was my first time sewing both ruffles and bias tape! If I was going to do one with bias tape around the pockets instead of ruffles, I'd make the inside pocket a little bit smaller (or the outside a little bit bigger) as the outside pockets didn't overlap as much as the Tatertots and Jello version.  However, that's at least partially because using a ruffle meant I lost about 1/2 of pocket to a seam allowance around the curve, where one with bias tape wouldn't... so it might actually be just fine.


Here's a picture to show how I used the pattern pieces as a guide to sew the pockets down (to make them fit the hands better). Fold along the guide line, then line up to the corner. Draw a line with a washable (or fading) fabric pencil/marker along the fold. Then flip and repeat. Sew down along the drawn lines. You might want to pin along first and check the fit - I designed it around my hands and I imagine it would work for most people, but if you have really large or small hands your mileage may vary!


Monday, July 16, 2012

Just monkeying around

I bought a pair of socks at the dollar store last week with the intention of using them to make one of the many sock-based crafts out there. Decided to go with the classic sock monkey, using the directions at Craft Passion: How To Sew A Sock Monkey. As I was working on him I really thought he was going to turn out, how should I put this... "special". But in the end I think he actually came together pretty well. It helps that I changed up the mouth a little bit because my toe seam ended up lower on the muzzle, and added "nostrils" by using a french knot in each nostril to pull the muzzle into a dimple. I did the same thing to give him a "belly button", too. Originally I tried embroidering a mouth where I felt it was "supposed" to be, and he kind of looked like he'd been freed from an experimental lab somewhere!

This was a nice, quick project - started it yesterday and finished it today. I used knee length socks for my monkey, and I don't know if I'd choose to do that again. Makes the appendages all long enough to knot around things, but they also ended up kind of lumpy. I don't know how to stuff long thin tubes without lumps! I think if I did a knee sock monkey again, besides trying to find another way to stuff the arms, legs, and tail, I'd also like to add wire to the limbs to make the monkey pose-able without tying knots.

Tuesday, July 3, 2012

How To: Cover A Wooden Letter With Fabric


 Modified from a tutorial for padded wooden letters I saw at Aflutter: Fabric Letters How To. I didn't really want to make a padded letter (plus I have no idea where my glue gun is at the moment!) but I remembered reading somewhere that HeatnBond can be used to attach fabric to walls. If it works on walls, why not letters?

Materials


• Wooden letter

• Two colors of fabric

• HeatnBond Ultra Hold (I found this at Wal-Mart)

• Iron

• Fabric scissors

• Sharp knife or rotary cutter

• Tacky glue (clear drying). I used a scrap booking glue called Scotch Quick-Dry Adhesive.

• Card stock

• Ruler

• Cutting mat (if using a rotary cutter)


1) Prewash your fabric (may not be 100% necessary, but the HeatnBond instructions recommend it) and iron to remove any wrinkles.

2) Cut a piece of HeatnBond slightly larger than your letter. You want it large enough to wrap most of the way around the sides.

3) Iron your piece of HeatnBond to the wrong side of your main fabric. If you're using a directional fabric, make sure you apply the HeatnBond to the fabric fairly straight.

4) Cut your fabric out around the HeatnBond. It may be helpful to leave a little tab of unbonded fabric to make peeling the paper backing off easier.

5) Peel off the paper backing and position your fabric right side up on the right side of your letter. If your fabric is directional, this is the time to make sure you have the right side up and everything straight! 

6) Iron your fabric onto the letter following the HeatnBond directions.


7) Trim off any fabric that will overlap past the edge of your letter. If you have long straight sides on your letter, fold them over and iron those down now.

8) Corners: To make your corners lie flat, fold your fabric over the corner, and run your finger over the overlapping fabric to make a finger crease. Cut out the little triangle of overlap with your scissors. Don't go all the way to the corner of the letter! Leave just a little bit there or there's a chance the wood might show through.


9) You may have to get creative with your cuts to make the fabric fold flat all the way around your letter.

10) Iron down any sides where your iron will reach. Otherwise, spread some tacky glue on the side of the letter and press your fabric down. 

• At this point you may want to put a tiny dab of glue on all the corners to keep them from fraying.

11) Now for the trim. Cut out strips of card stock wide enough to cover the sides of your letter. I cut my strips just slightly narrower than my letter to account for the thickness that will be added by folding the fabric over.


12) Spread some tacky glue evenly over your strips, leaving the last couple of inches unglued for now, and attach them to the wrong side of your second fabric. Allow to dry, then cut your fabric. Leave enough fabric on all sides when gluing and cutting to fold around the paper strips later.

13) On the fully glued end of your trim stripe, cut the corners of the fabric off diagonally. Spread some glue on the end of the paper and glue the end of the fabric down.


14) At this point I fit my strips to the letter, folding at the bends (you may want to use your knife or cutter to lightly score the paper at the folds if your paper is particularly thick). I started with the end that I already folded over, then I trimmed the other end so the paper ended at a corner (and then trim the fabric so it's long enough to just cover the end of the paper). On outside corners I always let one end of the trim overlap the edge just a little so the next piece of trim would butt up against it nicely.

15) Spread glue on the edges of the paper strip and fold over the remaining fabric edges. It's helpful to dot a little glue on the corners of the fabric and sort of push them down a bit - neatens them up and keeps the fabric from fraying

16) Spread glue on the back of each strip (being careful not to get too much near the front edge, so nothing oozes out onto the front of the letter) and press into place along the edge of the letter, working from one end to the other. Make sure to press well around corners, and especially into the inside corners.

•Gaps: There were a few tiny gaps I wanted to fit more tightly, so I put some glue on the end of a pin and worked it in between the trim and the letter, then pressed for a few seconds.

17) Admire your finished letter!